
In about 2 hours after posting this picture of one of my green chili pepper plants on Facebook, I got 500+ reactions and 80+ comments. Readers asked me how I was growing and fertilizing this chili pepper plant to make it amazingly fruitful. They wanted to know the pruning techniques I used to make the pepper plants so bushy and full. I wish I could reply to them in just a sentence or two! However, the secrets of growing a highly prolific pepper plant, need more explanation.
This impressive result is not because of a single fertilizer product or just by luck. It is a result of the readings and research on the subject, trials and errors over the years, and fine-tuning the process every year.
Want to see the difference? Look at A/B test below. Both the pepper plants in the images are of the same type, have started from seeds simultaneously, were transplanted in the garden on the same day, and received the same amount of sun per day. But as you can clearly see, Plant B is covered in pepper pods compared to a few green chilies on Plant A.
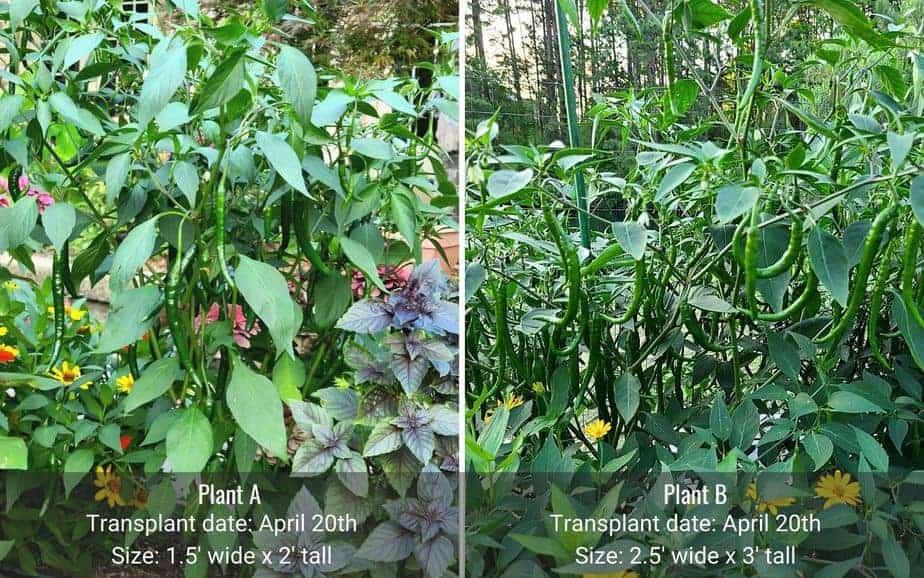
There is an astounding difference in yield because of the unique care Plant B received. Plant B grew in high-quality soil with nutrient-rich additives, received targeted fertilizer applications, and was pruned with the end result in mind (more on this in phase 2a, 2b, and 3 below.)
These pruning and fertilizing techniques can be applied to any type of pepper plant.
Before I dive deep into the step by step process, a friendly heads up. If you’re a beginner gardener or just looking for basic instructions on how to grow a pepper plant, you are probably at the wrong place. You will undoubtedly learn a lot, but there might be too much information and detail for you.
However, if you are a determined gardener who want to go an extra mile or two to get a higher yield from each pepper plant, let me share my lessons learned and how I grow them each year!

The article is divided into three phases of pepper plant care (and a printable schedule at the end):
Phase 1: Growing peppers from seeds indoors: this section covers when and how to start the pepper seeds at home, when and how to re-pot them, and how to fertilize them during their time indoors. If you are planning to buy a starter plant, you can skip this part.
Phase 2a: Pre-planting preparations: this section covers how to start preparing the garden bed for the pepper transplants by amending the soil with fertilizers and nutrients.
Phase 2b: Transplanting outdoors: this section covers when and how to transplant the pepper seedling into the garden, fertilizing and pruning them at the time of transplanting.
Phase 3: Caring for the pepper plant during the growing season: This section covers general care, fertilizer applications, insect/disease management, and pruning.
Optional Printable Schedule: I have created a printable schedule in PDF format to easily remember what to do when. This section gives instructions on how to fill it out.
Phase 1: Growing and caring for pepper seedlings
Most of the rare and exotic varieties of peppers like Indian chilies and other extremely hot peppers are not available as starter plants in garden centers or nurseries. If you want a particular type of pepper, your best bet is to find the seeds and sow them yourself.
If you are planning to buy a starter plant or sapling from somewhere, you can skip this part and jump to Phase 2a.
When to start pepper seeds indoors:
Pepper seeds need 8 to 10 weeks of indoor growing time before they are ready to be planted outside.
To decide when to start (sow) your pepper seeds, you need to find the spring’s last frost date in your area. The danger of frost will have passed by this date. Refer to this site to find out the first and last frost dates in your area: https://www.almanac.com/gardening/frostdates. These two dates are the most important dates for any gardener to know.
Grab a calendar and start counting the weeks backward from the last spring frost date. Consider the last frost date week 0. Go back 9 weeks to find the date when you can start the pepper seeds.
I start my pepper seeds 9 weeks before the last frost date in my area. The last frost date here is April 10th, making it week 0. When I count back for 9 weeks, I see that my target seed start date is February 7th.
How to start pepper seeds:
There are 2 ways to sow the seeds.
I have had success with both. I have documented how to start seeds (step-by-step), which will be helpful for the first-timers.
Most pepper seeds take between 7 to 21 days to germinate. I use Seedling Heat Mat to warm up the soil and speed up the germination process.
How to care for the pepper seedlings:
Strong seedlings make vigorous plants which perform much better in the garden.
Three things are essential to raising strong seedlings:
Regular watering: Check the soil every day. Water only when the soil looks light in color. Do not over or under-water the pepper seedlings. Water stress ruptures the cell walls of the plants and may damage them permanently.
Adequate light source: Provide 12 to 15 hours of a continuous light source. Putting the seed starting tray near the sunny window is not enough. Set up an indoor plant light, about 2 inches above the seedlings to give them enough light, so they never have to stretch themselves. This prevents the ‘leggy seedlings’ condition. Having a digital timer set up from 7am to 10pm assures consistency.
Steady temperature: Once the leaves start to form, avoid having the surrounding temperature change suddenly or frequently. For example, a direct draft of a heater vent, opening, and closing windows, etc. Leave the Seedling Heat Mat under the seedling tray and place the seedling tray in an unused, protected corner of the house.
Apart from the above, make sure the area is well ventilated. Lack of airflow can promote fungal growth on the soil and seedlings and attract insects. If that happens, use Neem oil to control fungus gnats and other insects near the seedlings.
How to fertilize the pepper seedlings:
In three weeks after sowing the seeds, the first set of true leaves start to appear. (The very first leaves that you see emerging from the seeds don’t count. These are not TRUE leaves.). Wait for the first set of true leaves to develop before applying fertilizer to the pepper seedlings. Doing this too soon can burn the young seedlings.
Once the seedlings have at least one set of true leaves, they are ready to pot up. The seedling should be transplanted to a bigger pot, which is at least 3 inches wide by 3 inches long and 3 to 5 inches tall. This will give each seedling space to grow dense root mass.
Granular fertilizer application
Mix 3 tbsp of All-Purpose Fertilizer (with equal amounts of Nitrogen-N, Phosphorus- P and Potassium-K) and 3 tbsp of Earthworm Castings with 1 quart of high-quality potting mix. Use this mixture to fill up the new pots. Transfer the seedlings to the bigger containers and water thoroughly.
If you are not familiar with earthworm castings, here is a detailed guide about worm casting’s benefits in the garden.
I use Jobe’s All-Purpose Organic Fertilizer at this stage. It has N-P-K ratio of 4-4-4 and it does not burn the seedlings.
Liquid fertilizer applications
After two weeks of potting up the seedlings, feed the seedlings with Liquid Seaweed and Fish Fertilizer. Mix this fertilizer with water as written on the label, and apply this mixture to the soil instead of regular water on that day.
This fertilizer is VERY stinky. I take my pepper seedlings outdoor on a sunny day when I apply this fertilizer. I keep them out for an hour or two, covered in a floating row cover to let the odor diminish.
Repeat the liquid fertilizer application two weeks after the last application.

Phase 2a: Pre-planting preparation
A few but critical tasks need to be done before the transplant date.
Two weeks before transplanting:
While the pepper seedlings are growing indoors, you should start preparing the area where they will grow during the main season. If you haven’t decided, now is the time to think about where you want to plant them outdoors.
Sun Requirement: The pepper plants needs at least 8 hours of direct sun to grow optimally. If your area is too hot during the summer, a partially sunny area that receives at least 6 hours of sunlight would be sufficient.
Preparation for the garden bed:
A raised garden bed that is at least 6 inches high is the best place for pepper plants. (See the complete guide to set up raided garden beds.) Fill the raised bed with soil made by mixing 1/3 of peat moss, 1/3 of perlite, and 1/3 of compost. Another alternative is to use a mix of 1/3 of topsoil and 1/3 of compost and 1/3 of perlite or vermiculite.
If you plan to grow pepper plants in pots or grow bags or elevated garden beds with legs, you can use any one of the above soil mixtures to fill them up.
To grow an extraordinarily prolific pepper plant, you have to provide it extraordinary soil. This is where you need to go the extra mile.
Next is one of the most important steps of all: amend the soil with nutrient-rich additives.
Add the following items to the soil as per label and mix them thoroughly up to 6 inches deep.
- Composted Cow manure: It adds large amount of organic matter to the soil and increases moisture holding capacity of the soil.
- Earthworm castings: It is loaded with organic matter and adds tons of microorganisms to the soil. It helps the plants in flower production and boosts the immunity to fight diseases.
- Coffee grounds: It adds Nitrogen and improves soil drainage. It also attracts earth worms and provide food for them to grow.
- Rockdust: It adds micro nutrients like Magnesium, Iron, Calcium etc which are essential for healthy plants. It also improves soil structure.
- Garden Lime: Peppers like the soil pH between 6 and 7.5. Do the soil pH test of the soil where the peppers will be planted. If it is too acidic (below 6), add garden lime to raise pH.
Add these items to the garden soil a couple of weeks before planting to allow them to start decomposing. This will make the nutrients readily available for the baby plants to absorb.
One week before transplanting:
If buying starter plant/sapling, skip this section.
Start the seedling hardening off process 7 days before moving them outdoors permanently. The goal is to gradually expose the seedlings to the outdoor environment, so they can accustom to their new surroundings. Failure to do so will stun the seedlings and hinder their development and productivity.
Take the seedlings outdoors each day for the duration given in the table below and bring them back inside. When outdoors, place them where they are protected from the wind. Ensure the weather is above 60F during the day, and check on them frequently and water them if needed.
| Day | Duration | Instruction |
| 1 | 1 hour | Place seedlings in shade. |
| 2 | 2 hours | Place seedlings in partial shade. Briefly expose them to direct sun for 30 minutes. |
| 3 | 4- 6 hours | Place seedlings in partial shade. Briefly expose them to direct sun for 1 hour. |
| 4 | 12 hours | Place seedlings in partial shade. Move them to direct sun for 5 to 6 hours. |
| 5 | Morning to evening | Place seedlings in the direct sun. Bring them back indoors at night. |
| 6 | All day + Overnight | Place seedlings in the direct sun. Leave them out overnight. |
| 7 | All the time | Seedlings are ready to be transplanted outdoors. |
Phase 2b: Transplanting pepper seedlings
Once the last spring frost date has passed, and the nighttime temperature is consistently above 50F, the pepper seedlings are ready to be planted outdoors.
– Space the pepper seedlings about 18 to 24 inches apart from each other. Peppers grow best when the two side by side pepper plant leaves are touching each other.
-Dig a hole 6 inches deep.
–Planting hole recipe: Add the following items to each planting hole and mix the soil thoroughly.
- ½ tsp of Epsom Salt
- 1 eggshell (crushed) or 1 banana peel (chopped)
- ¼ cup of all-purpose fertilizer
- 1/2 tsp of blood meal
-Plant the pepper seedling in the hole at the same height as it was in the pot before.
-Press gently around the soil to remove air bubbles.
-Thoroughly drench the soil with water.
-Pinch the growing tip of the pepper plant. This will promote side shoots and branches. The more branches the plant has, the more space it has to produce peppers!
-Carefully remove all flowers from the plant, if any. At this stage, all the plant energy should be routed in growing deep roots and new leaves.
I highly recommend covering the young seedlings with a floating row cover. This will protect the plants from harsh sun, sudden drops in temperature, and windy conditions and insects that prey on the leaves of the young plants.
Phase 3: Caring the pepper plants during the growing season
Watering:
Pepper plants do not like to be overwatered. In my observations, a pepper plant watered through an irrigation system on a scheduled timer performed worse than the plant that received water only when needed!
Always check the soil to see if it needs to be watered. Dry soil looks lighter in color and does not hold together when squeezed.
When watering the pepper plants, water slowly so it can be absorbed by the soil and deeply, so enough water reaches the deep ends of the roots.
I manually water most of my vegetable plants using a Venti-sized Starbucks cup with two holes in the bottom. I scoop water from a bucket and hold the cup near the base of the plant. Water gently drips through the holes of the cup and goes straight down the soil. That is enough water for the plant for two to three days in average weather.
If the temperature goes above 90F, check the moisture once a day and water if needed.
Insect and Disease control:
The saying, “The best defense is a good offence” applies perfectly here. Do not wait till insects and diseases attack the young plants. Be proactive and spray the pepper plants with DIY Neem Oil Spray every two weeks.
Neem oil contains a chemical that interrupts the feeding and breeding patterns of insects like Aphids, mealybugs, beetles, etc. Neem oil also prevents and treats bacterial infections and fungal diseases like powdery mildew, blight, rust, and black spots.
How to fertilize and prune the pepper plant
This is another especially vital section to maximize your yield. Tips on this section may seem counter-intuitive, but it works!
The image below depicts the growth of two pepper plants: One raised conventionally vs. one raised by optimizing the timing of leaf and flower production.
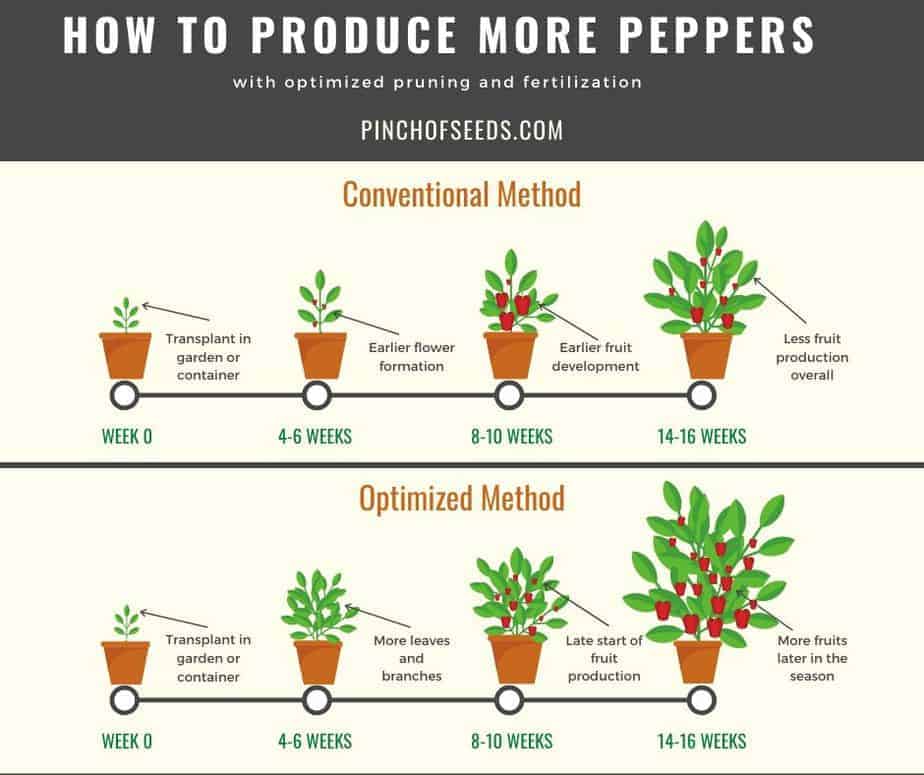
The idea here is to encourage the plant to grow big and tall with many branches before allowing it to grow flowers and fruits. The more branches the plant has, the more flowers it produces, and eventually, it floods the plant with peppers.
This can be achieved by timing the leafy growth and fruit production as below:
First 6 weeks after transplanting:
– For the first few weeks, provide plenty of Nitrogen(N) to promote leafy growth – which is why it is essential to add Cow manure, Coffee grounds, and blood meal.
– In addition, the Seaweed and fish fertilizer can be applied every two weeks.
– Pinch off the tips of the plant again after 4 weeks of transplanting. This encourages more branching and eventually, more areas for flowers to grow.
– Remove any flowers and fruits from the plant for the first 4 weeks. They take away from the energy needed to grow leaves and branches.
– Hold off on adding any ‘vegetable fertilizer’ for the first 6 weeks. Most of them are high on Phosphorus and Potash to encourage more flowers and fruits, which is not desirable at this time.
After 6 weeks:
– After 6 weeks of transplanting, add fertilizer which has high Phosphorus (P) value. A few good choices are Dr. Earth’s Organic vegetable fertilizer (4-6-3), Jobe’s Organics Tomato and vegetable Fertilizer (2-5-3) and Burpee Organic Tomato + Vegetable Fertilizer (3-6-4). For container grown peppers, a slow release granular fertilizer or fertilizer spikes can be used. Repeat this fertilizer application every six weeks until a month before the first frost date.
-If growing large peppers like Banana Peppers or Bell peppers, continue adding crushed egg shells or banana peel water as and when you can. Both of these add Calcium to the soil. Lack of Calcium can cause peppers to rot from the bottom, which is called Blossom End Rot.
– Continue applying liquid fertilizer like Seaweed and fish fertilizer or compost tea every other week. Skip the liquid fertilizer application on the week when the granular fertilizer is applied.

Pollination:
You may get plenty of flowers, but they must pollinate to produce peppers. That’s why insects like bees, butterflies, and wasps are essential for the pepper flowers to turn into pepper pods.
Plant Zinnia, Marigold, Vinca, or other flowering plants that attract pollinators between or near the pepper plants.
Harvesting:
The goal of a plant is to produce seeds. Once the fruits are set on the plant, it focuses the energy in maturing the existing fruits. When the fruits mature (turn the color from green to red), the plant’s job is done. It stops producing more flowers and fruits.
That’s why it is important to remove the peppers as it grows, so the plant continues to produce more flowers and peppers. Unless you are growing a pepper variety for it’s color, do not let the pepper pods to mature and turn color on the plant.
The more peppers you harvest, the more peppers the plant will produce.
Summary:
To grow an amazingly fruitful chili pepper, bell pepper or hot pepper plant:
- Focus on growing more robust seedlings
- Invest in building high quality, nutrient-rich soil
- Time the leafy growth and fruit growth by adjusting pruning and fertilizer applications
The type of pepper and the growing conditions play vital roles in pepper production. Although I can’t guarantee you will get the same result as me, you should see significant improvements in terms of yield per plant if you follow the tips shared in this article.
If you find the information helpful, please share this article using social media buttons below the article.
Ask your questions:
Have a question about growing peppers? Leave a comment below or connect with me on Pinch of seeds group on Facebook. You can ask questions, give feedback, post a picture for photo consultation and interact with other gardeners.
Printable Schedules (Coming Early 2021):
For the readers of the Pinchofseeds.com, an easy to follow, week by week plan of pruning and fertilizing pepper plants will be available in a PDF format.
The printable plan includes:
- Pepper seeding fertilizing schedule
- Pepper plant care schedule
- 2021 Calendar
All you need is the dates for the last spring frost and first fall frost in your area. Then, using the included calendar, you can easily calculate the dates and fill out the plans.
Each row has instruction on what you need to do that week, a handy check box to mark the task when completed and space to write down your own notes and observations.
If you would like to be notified when this plan is available to download, join the Pinch of seeds group on Facebook.
Last Updated: 1/08/2021
Hi Gopi,
Very informative website. What is the variety of these Indian hot pepper in your garden pictures? Do you sell these Indian Chill1 Pepper Seeds or direct me where to buy these? Keep up the good work!
Thanks
HI Felix!
Yes, this are Indian Hot peppers!
-Gopi
All I can say is thank you thank you thank you what great information I look forward to growing my peppers
Hi Gopi,
I’m a bit confused about the two sub-sections listed under HOW TO FERTILIZE AND PRUNE THE PEPPER PLANT (Under Phase 3), namely:
– First 6 weeks after transplanting
– After 6 weeks (of transplanting)
I get the first sub-section, but cannot fathom out where the second time-frame kicks in! Do you mean that you carry out the second part after completing the first part, or are they both carried out at the same time? Please could you give me some pointers?
Let me just say that I am totally rapped to be here! I have battled to keep my little curry leaf plant going for over a year, and your blog is what gives me hope because of its comprehensive, detailed account on how to keep these ‘exotics’ thriving. I cannot thank you enough! ~ Heather 🙂
Thank you for your kind words, Heather!
Yes you got it right: carry out the second part after the first 6 weeks are complete. Do not overlap the treatments from both the sections.
I hope this helps!
-Gopi